Wednesday, July 30, 2014

Raspberry Pi News

I know I'm late to the show with my own blog post about the new happenings issuing forth from the Raspberry Pi Foundation, but I figured better late than never.

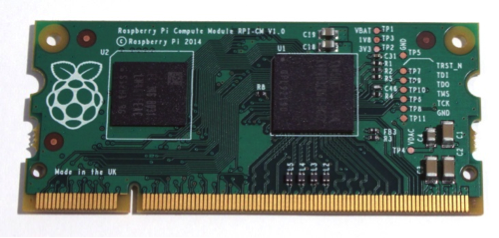
A few new developments have made news recently and bode well for hobbyists and inventors alike. The first (chronologically) was the release of the compute module. This is a raspberry pi just like any other, except that the whole thing is designed onto a chip that looks just like a laptop memory module.
The cool part about this is that people can now design their own main board and slip in this tiny chip to get all the features or the raspberry. This means that the main board can be designed to fit just about any need out there from small point-and-shoot cameras to large supercomputers. The foundation came out with an example main board:
But this is just an example and a board like this could be designed to meet the inventor's needs, changing the number of pins, ports, connectors, etc.

The second bit of gooey goodness is the release of the Raspberry Pi Model B+. This is the next evolutionary (not revolutionary) step in the progression of this little platform.
This new model is pretty much backward compatible with the Model B, but adds a couple of really useful features:

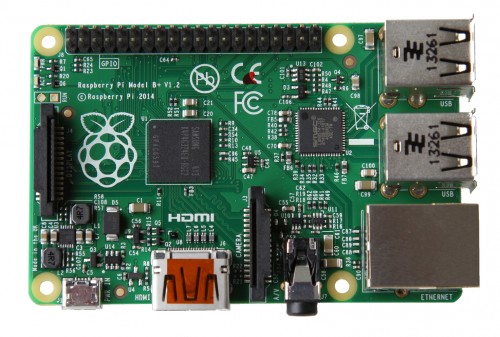
  • More GPIO pins - 40 pins instead of 26. (This also allows old IDE hard drive ribbon cables to be used!)
  • More USB ports - 4 ports instead of 2.
  • Micro SD - the SD is smaller, has a secure latch, and doesn't stick out anymore.
  • Power redesign - the B+ uses less power due to better technology.
  • Better audio - this should be good for my PiTunes.
  • Better form factor - all the onboard ports now only come out of 2 sides instead of the 4. This should make stuffing the Pi into a small corner a bit easier. Also, the mounting holes are uniform and there are 4 of them, which should make building cases a bit easier. Also it helped pave the way for HATs (more on this later).


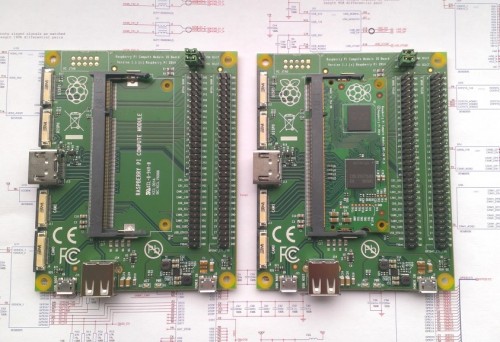
The third bit of really cool news is the release of specifications around HATs (Hardware Attached to the Top). To break it down very simply, this allows add-on boards to tell the Pi that they're connected and give specific information about themselves to the Pi. This could make connecting an add on board very simple since instructions could be included in the add on board itself that help set it up (install software, configure pins, setup shortcuts on the desktop, etc.). I haven't found the official blog post announcing it, but James Adams spoke about it in a recent interview. Here is what they're theoretically supposed to look like. I'm guessing Adafruit will be releasing a HAT starter board soon which would at least include the mounting hardware (since the holes should line up with the holes on the B+) and maybe the EEPROM and other components defined by the standard.

In case that wasn't enough, I've seen two articles recently that I've kept in my browser tabs so that I can refer to them the next time I purchase a Pi (usually every other month). The first is an update about the method used by many to turn the Pi into a video game emulator. This used to be a really complicated process that took a ton of time, but thanks to the guys over at petRockBlog and Emulation Station, this process is greatly improved. You can go straight to the source, or you can check out this article which gives instructions for the uninitiated (it's spelled out pretty clearly). I've got a B+ on order right now, so as soon as it comes in, this will be on of the first things I do with it.

And if that's not enough, here's an article about the first 5 things to do after powering on your Pi. While installing Minecraft and overclocking aren't required, they are mentioned as the most popular things to do.

Monday, July 14, 2014

Creating a Security Camera Page for the iPad

I may have posted before about the Foscam cameras I have around my house. I have one inside the house and three outside, covering all the doors. There are a myriad of apps out there that allow you to view live streams from Foscam cameras, however, most of them are either designed for iPhone (thus for iPad you have to use pixel doubling, which sucks) and/or they have a bunch of chrome that I'd rather not waste screen real estate showing.

A couple years ago I bought one of the first generation iPads. It was great, but given the OS upgrades that it's missing out on and the low resources that most modern apps blow right past, it's become less and less used. I decided to get some more use out of it by building a small web page with custom controls to stream each of my cameras' feeds to the iPad. The thought was to mount the iPad near the front door so that I could do a quick check of all the cameras while walking to the front door to answer a caller (since one of the cameras looks at the front door, I'd also get a quick look at the caller without looking through the peephole). After looking around at some of the DIY options, I decided to go with a Luxone iPad Wall Mount since they had one specifically built for the 1st generation iPad. It was more expensive than some of the DIY options, but the finished product looks cleaner (IMO). The place where I had decided to mount the iPad had a light switch right below it. A quick test with the multimeter showed that power is run to the switch instead of the light, so I could wire in an iPad charger which would draw power regardless of the state of the light switch. Fast forward a couple of hours and I had made some room in the circuit box for the iPad charger, soldered on some leads which were wired into the switch's hot wires and ran the iPad cable up and out of the switch to the wall mount. The end result is that the iPad sits in a landscape position and always has power. A quick change of the config so that it never auto-locks and the iPad stays on 24/7.

As for the page, I had several web servers around were I could host the page. It didn't take much to design the page, but I wanted some extra fun. I decided that tapping on a camera feed should blow the feed up to the full size of the screen. Tapping again would shrink it down to its original size. This was easily accomplished with a bit of CSS. Essentially, there are three things in the CSS:

  1. The standard classes that setup the body
  2. An option that sets the initial size of each stream and specifies the timing function for CSS animations.
  3. 4 classes that determine where the streams sit
  4. 2 classes that are tied to the animation (one to grow one to shrink)
  5. 2 animations (one to grow one to shrink)
After that, there's a simple javascript that does two main things depending on whether the image is its original size or has been blown up to full screen:

  1. Switch to the other class so that the animation happens
  2. Set the final style parameters of the stream so it stays the way it is at the end of the animation
Then there are the streams themselves. I added username and password parameters to the URLs so they don't have to be typed in every time. There were some other parameters that I added so that when I saved a bookmark to the home screen it would open up and look like an app. The details are here. I really only added <meta name="apple-mobile-web-app-capable" content="yes"> and <meta name="apple-mobile-web-app-status-bar-style" content="black-translucent">. Then I pulled up the page in Safari, added a shortcut from there to my home screen and closed Safari. Now when I open using the shortcut, it opens up as if it were a separate app from Safari and none of the Chrome is there.