Rolling your on VPN can have various benefits. The biggest of which is that when you're on an unsecured network (i.e. any wifi network that you don't own yourself) your traffic is encrypted back to your home and then goes out to the internet. This means that you don't have to trust that the WiFi owner (think Starbucks or McDonald's) isn't snooping on your packets. It doesn't matter if they do snoop it because you're packets are encrypted and nobody can understand it unless they are you or your RaspberryPi at home.
Before you contest, yes, I know that any form of encryption can eventually be beaten. If you're that paranoid about someone decrypting your packets (which would take years by the way) you should be off the grid.
That said, I looked into setting up a VPN option for myself and eventually found PiVPN. This little one line installer sets everything up on your RPi so that it becomes a VPN endpoint. Use it to generate a certificate which you can load on your device (I've tested on iOS and Windows 10) into the freely available OpenVPN client.
I have since found, but not installed/tried a web GUI that should let me manage PiVPN through a browser. I hope to try this eventually after I have some free time. So, probably next year!
Showing posts with label Raspberry Pi. Show all posts
Showing posts with label Raspberry Pi. Show all posts
Thursday, December 7, 2017


Wednesday, December 6, 2017
Tuesday, December 5, 2017
PressPi
I wanted to figure out the best way to put WordPress on a RaspberryPi. Turns out the best way is an image called PressPi. Load this up, lock down all the security, load CertBot so it's all running over https and you're good to go.
In case you're interested, here's a good set of instructions for installing Wordpress on Ubuntu 16.04. So many instructions! You might need phpMyAdmin as well.
In case you're interested, here's a good set of instructions for installing Wordpress on Ubuntu 16.04. So many instructions! You might need phpMyAdmin as well.
Friday, August 5, 2016
Thursday, June 11, 2015
Wednesday, July 30, 2014
Raspberry Pi News
I know I'm late to the show with my own blog post about the new happenings issuing forth from the Raspberry Pi Foundation, but I figured better late than never.
A few new developments have made news recently and bode well for hobbyists and inventors alike. The first (chronologically) was the release of the compute module. This is a raspberry pi just like any other, except that the whole thing is designed onto a chip that looks just like a laptop memory module.
 The cool part about this is that people can now design their own main board and slip in this tiny chip to get all the features or the raspberry. This means that the main board can be designed to fit just about any need out there from small point-and-shoot cameras to large supercomputers. The foundation came out with an example main board:
 But this is just an example and a board like this could be designed to meet the inventor's needs, changing the number of pins, ports, connectors, etc.
The second bit of gooey goodness is the release of the Raspberry Pi Model B+. This is the next evolutionary (not revolutionary) step in the progression of this little platform.
 This new model is pretty much backward compatible with the Model B, but adds a couple of really useful features:
The third bit of really cool news is the release of specifications around HATs (Hardware Attached to the Top). To break it down very simply, this allows add-on boards to tell the Pi that they're connected and give specific information about themselves to the Pi. This could make connecting an add on board very simple since instructions could be included in the add on board itself that help set it up (install software, configure pins, setup shortcuts on the desktop, etc.). I haven't found the official blog post announcing it, but James Adams spoke about it in a recent interview. Here is what they're theoretically supposed to look like. I'm guessing Adafruit will be releasing a HAT starter board soon which would at least include the mounting hardware (since the holes should line up with the holes on the B+) and maybe the EEPROM and other components defined by the standard.
In case that wasn't enough, I've seen two articles recently that I've kept in my browser tabs so that I can refer to them the next time I purchase a Pi (usually every other month). The first is an update about the method used by many to turn the Pi into a video game emulator. This used to be a really complicated process that took a ton of time, but thanks to the guys over at petRockBlog and Emulation Station, this process is greatly improved. You can go straight to the source, or you can check out this article which gives instructions for the uninitiated (it's spelled out pretty clearly). I've got a B+ on order right now, so as soon as it comes in, this will be on of the first things I do with it.
And if that's not enough, here's an article about the first 5 things to do after powering on your Pi. While installing Minecraft and overclocking aren't required, they are mentioned as the most popular things to do.
A few new developments have made news recently and bode well for hobbyists and inventors alike. The first (chronologically) was the release of the compute module. This is a raspberry pi just like any other, except that the whole thing is designed onto a chip that looks just like a laptop memory module.
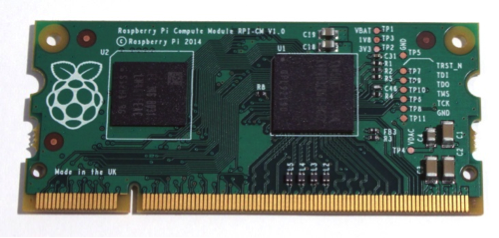
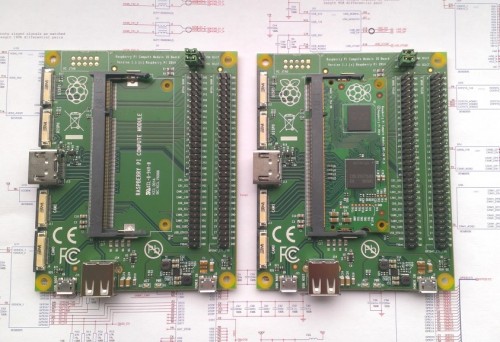
The second bit of gooey goodness is the release of the Raspberry Pi Model B+. This is the next evolutionary (not revolutionary) step in the progression of this little platform.
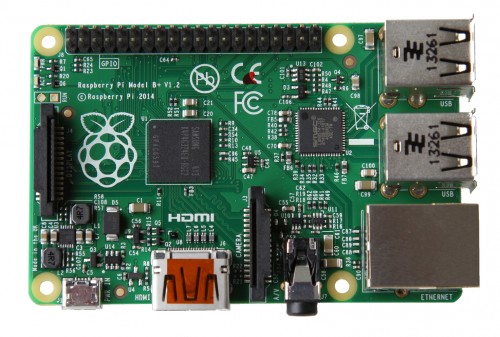
- More GPIO pins - 40 pins instead of 26. (This also allows old IDE hard drive ribbon cables to be used!)
- More USB ports - 4 ports instead of 2.
- Micro SD - the SD is smaller, has a secure latch, and doesn't stick out anymore.
- Power redesign - the B+ uses less power due to better technology.
- Better audio - this should be good for my PiTunes.
- Better form factor - all the onboard ports now only come out of 2 sides instead of the 4. This should make stuffing the Pi into a small corner a bit easier. Also, the mounting holes are uniform and there are 4 of them, which should make building cases a bit easier. Also it helped pave the way for HATs (more on this later).
The third bit of really cool news is the release of specifications around HATs (Hardware Attached to the Top). To break it down very simply, this allows add-on boards to tell the Pi that they're connected and give specific information about themselves to the Pi. This could make connecting an add on board very simple since instructions could be included in the add on board itself that help set it up (install software, configure pins, setup shortcuts on the desktop, etc.). I haven't found the official blog post announcing it, but James Adams spoke about it in a recent interview. Here is what they're theoretically supposed to look like. I'm guessing Adafruit will be releasing a HAT starter board soon which would at least include the mounting hardware (since the holes should line up with the holes on the B+) and maybe the EEPROM and other components defined by the standard.
In case that wasn't enough, I've seen two articles recently that I've kept in my browser tabs so that I can refer to them the next time I purchase a Pi (usually every other month). The first is an update about the method used by many to turn the Pi into a video game emulator. This used to be a really complicated process that took a ton of time, but thanks to the guys over at petRockBlog and Emulation Station, this process is greatly improved. You can go straight to the source, or you can check out this article which gives instructions for the uninitiated (it's spelled out pretty clearly). I've got a B+ on order right now, so as soon as it comes in, this will be on of the first things I do with it.
And if that's not enough, here's an article about the first 5 things to do after powering on your Pi. While installing Minecraft and overclocking aren't required, they are mentioned as the most popular things to do.
Monday, March 10, 2014
Raspberry Pi Possible Projects
Whenever I get into a conversation with people about the RaspberryPi, the question always comes up, "What would I do with something like that?" This post answers that question. In addition to the two projects that I've already completed (PiTunes, DoPi), here are some project that I've run across that are pretty cool ideas:
- Make your own radio station - be careful with this one; once you're transmitting beyond a particular power level (which isn't really controllable in the Pi), you're required to have a license from the FCC (even if no one else is transmitting on the same frequency).
- Make an motion detector - this one is pretty cool since it uses Google's translate service to speak whatever text you want.
- Get the heck outta my office device - Ok, this one actually uses an arduino, but it would be pretty easy to make something like this using the RPi.
- Make a simple webcam
- Make an Apple iBeacon - I may actually integrate this into DoPi at some point so you get a push notification on your phone as you drive up to your house, prompting you to open the garage door. Otherwise, it could be used for a variety of annoying reasons (including on a convention floor to drive people to your booth...). (Alternate method)
- Make an AirPlay receiver - an AirPlay receiver will receive a stream of music from an Apple iOS device (phone, tablet, or even iTunes on a PC/Mac) and output it to speakers. This can be handy if you ever wanted to add music to a room without major electronics.
- Make a camera
- Make a tablet
- Connect your analog phones to Google Voice
Friday, January 10, 2014
UCDavis MIB for Monitoring Linux Memory
I discovered quite some time ago that the Net-SNMP agent on my RaspberryPi doesn't report memory utilization in the hrstorage MIB like I would expect it to. It's not wrong, however, the value doesn't match up with what's actually being used on the device. The reason for that is that Linux can use the system RAM for several things: processes, shared memory for processes, buffers, and disk cache. When most people ask how much memory is in use, they are asking for how much memory is in use by the processes. That's the value you get on the second row under the 'used' column of the output of the free command:
However, the OIDs in the hrstorage MIB actually return the value from the first row of the 'used' column. The problem is that both of these numbers represent memory utilization. The first row shows the total of the processes, shared, buffers, and cache. That's the total amount of memory that's in use on the system. However, this isn't the value most people associate with memory utilization.
In order to get the correct value, there are two options. The first doesn't work with NetVoyant, but it doesn't use additional MIBs or OIDs to get the data.
Since the shared, buffer, and cache memory is reported in the hrstorage table, you can simply take hrStorageSize of the Physical Memory row (hrStorageType==1.3.6.1.2.1.25.2.2), and subtract the hrStorageUsed from the shared, buffer, and cache rows (hrStorageType==1.3.6.1.2.1.25.2.1.1). Since NetVoyant can't use values from other poll instances in an expression, it won't work in NV.
Given the output above, here are the OIDs or combinations you need to calculate the values:
However, the OIDs in the hrstorage MIB actually return the value from the first row of the 'used' column. The problem is that both of these numbers represent memory utilization. The first row shows the total of the processes, shared, buffers, and cache. That's the total amount of memory that's in use on the system. However, this isn't the value most people associate with memory utilization.
In order to get the correct value, there are two options. The first doesn't work with NetVoyant, but it doesn't use additional MIBs or OIDs to get the data.
Since the shared, buffer, and cache memory is reported in the hrstorage table, you can simply take hrStorageSize of the Physical Memory row (hrStorageType==1.3.6.1.2.1.25.2.2), and subtract the hrStorageUsed from the shared, buffer, and cache rows (hrStorageType==1.3.6.1.2.1.25.2.1.1). Since NetVoyant can't use values from other poll instances in an expression, it won't work in NV.
Side Note: This may be possible by creating a single expression that results in the positive value of hrStorageSize when the hrStorageType is .2 and a negative value of hrStorageUsed when hrStorageType is .1. The sum of that expression for all the .1 and .2 poll instances should give you the total used memory. However, since the sum could only be done in a view in the web GUI, it would only work for reporting and not thresholding/alarming.The second option is to use the UCDavis MIB. The NetSNMP agent does populate the UCDavis tables, so any of the values there can be polled. The problem is that there's no real clear documentation on which OIDs give you which values when compared to the output of the free command. Here's the mappping:
Given the output above, here are the OIDs or combinations you need to calculate the values:
- memTotalReal
- memTotalReal - memAvailReal
- memAvailReal
- memShared
- memBuffer
- memCached
- memTotalReal - memAvailReal - memShared - memBuffer - memCached
- memAvailReal + memShared + memBuffer + memCached
- memTotalSwap
- memSwapError
- memAvailSwap
Given this, it should be pretty easy to create a dataset to poll memory. Just remember, these OIDs are in units of KB, so if you want it in Bytes so that NV automatically scales (to KB, MB, GB, TB, etc.) you'll need to multiply each one by 1024. Obviously, if you're calculating % utilization, you don't need to multiply both the numerator and the denominator by 1024. You will need to multiply by 100 to get the ratio to a scale of 0-100%.
Wednesday, September 4, 2013
PiTunes with USB Sound
Continuing my ever improving efforts towards my PiTunes system, I've made some modifications. The most recent modifications were to address two different problems: 1) sound quality isn't great and 2) WiFi.
First, the sound quality. We've noticed sometimes that the sound playback isn't great. Sometimes the sound skips or pops. This is apparently an issue with the analog audio port on the Raspberry Pi. I'm not totally versed on it, but basically, it's not a regular audio out port. The RPi guys skimped by not putting in a dedicated digital to audio converter (to convert the digital signal from the chip to analog) so they used a workaround that isn't great. Since most people use the digital signal through the HDMI port it isn't a problem. The workaround is to use a separate sound card. I opted for a USB sound card. They're pretty cheap and fairly ubiquitous. I got mine for $2.51 plus shipping. Not bad. I installed the USB card and rebooted the Pi. Now all I had to do was get the Pi to recognize the USB sound card as the default instead of the on board analog out port. I wouldn't have figured this one out without the help of my good friend down under, SirLagz. He's got a lot of cool stuff about RPi on his blog. Check it out! No seriously, you need to look at it.
So, to disable the on board sound card, the /etc/modprobe.d/alsa-base.conf file needs to be edited. Mine now looks like this:
After a reboot, the USB device became the primary. Then I had to update my script so that it would change the volume on the proper output port. To find out what it had to be changed to, I ran alsamixer and looked at the name at the bottom of the slider. In my case, the name was 'Speaker'. So, here's what my script looks like now. I've tested it once, we'll see how it works tonight. So far, the sound quality is much better:
First, the sound quality. We've noticed sometimes that the sound playback isn't great. Sometimes the sound skips or pops. This is apparently an issue with the analog audio port on the Raspberry Pi. I'm not totally versed on it, but basically, it's not a regular audio out port. The RPi guys skimped by not putting in a dedicated digital to audio converter (to convert the digital signal from the chip to analog) so they used a workaround that isn't great. Since most people use the digital signal through the HDMI port it isn't a problem. The workaround is to use a separate sound card. I opted for a USB sound card. They're pretty cheap and fairly ubiquitous. I got mine for $2.51 plus shipping. Not bad. I installed the USB card and rebooted the Pi. Now all I had to do was get the Pi to recognize the USB sound card as the default instead of the on board analog out port. I wouldn't have figured this one out without the help of my good friend down under, SirLagz. He's got a lot of cool stuff about RPi on his blog. Check it out! No seriously, you need to look at it.
So, to disable the on board sound card, the /etc/modprobe.d/alsa-base.conf file needs to be edited. Mine now looks like this:
After a reboot, the USB device became the primary. Then I had to update my script so that it would change the volume on the proper output port. To find out what it had to be changed to, I ran alsamixer and looked at the name at the bottom of the slider. In my case, the name was 'Speaker'. So, here's what my script looks like now. I've tested it once, we'll see how it works tonight. So far, the sound quality is much better:
Wednesday, August 21, 2013
Dropping Dropbox and Google Drive for BTSync & a Raspberry Pi
I thought this article deserved republication, so I decided to take the easy route with today's post and just link to Jack's blog post. In his post, Jack describes how he decided to drop his cloud file sync'ing app in favor of something run in house. The best part about it is that it works just as well as Dropbox or Google Drive, but without putting your file on any device other than your own. The advantage of this, as I've posted before, is that you can sync an unlimited number and size of files.
I've done something similar to this using Western Digital's My Book Live Duo. Since the MBLD runs on Linux (Lenny Squeeze), it was pretty easy to load BTSync and fire it up. So, my NAS participates in the synchronization of my folders from my desktop to my laptop. So, even if my desktop is offine (or in standby) I can still sync between my laptop and my NAS (over the internet too) and when my desktop comes online it'll sync up with the NAS and laptop.
I've done something similar to this using Western Digital's My Book Live Duo. Since the MBLD runs on Linux (Lenny Squeeze), it was pretty easy to load BTSync and fire it up. So, my NAS participates in the synchronization of my folders from my desktop to my laptop. So, even if my desktop is offine (or in standby) I can still sync between my laptop and my NAS (over the internet too) and when my desktop comes online it'll sync up with the NAS and laptop.
Monday, June 3, 2013
PiTunes
Previously, I posted my experience automating iTunes for use in the nursery. That has been working very well and I wouldn't normally see any reason to change it. However, since I recently acquired a Raspberry Pi, I've had several ideas about what to do with it. The idea that won was to replace the nursery room computer (which was already a Dell Studio Hybrid small form factor PC). The advantages would be that the Pi is fanless and quite a bit smaller. I could also then reuse the Dell Hybrid for other things.
The same objectives apply:
By the way, the contents of /mnt/nas/PiTunes are: christmas/ nothing/ music/ play.sh waves/. Version 2 of the script will play the Christmas directory instead of the music directory during the month of December.
The next part involves running the script from CRON, which is equivalent to Windows' Scheduled Tasks. To add jobs, just run crontab -e. The format is one job per line, parameters separated by spaces:
Mine looks like this:
So, let's look at the objectives again:
The same objectives apply:
- I want the music to come on and turn off by itself
- I don't want the music to start off at full blast in case we've put the boys down early.
- I want the music to play whenever we put the boys to sleep, which could be as early as 7pm but as late as 9pm.
- I want to be able to rotate playlists so it's not the same thing every night.
- I want to be able to kick off the music any time.
- I want to be able to manually override either the current song or the current volume level.
So, of course the first thing I did was download the Rasbian image and get it booted up, connected via SSH, and downloading updates. I'll assume if you're also trying to do this that you'll use the instructions at RaspberryPi.org to get you started with that. To get the most recent updates, type sudo apt-get update && sudo apt-get upgrade. This may take a while, depending on your internet speed. The Raspberry Pi doesn't have that much CPU either, so you might just kick this one off and go to bed.
I also purchased a Netgear G54/N150 Wireless USB Micro Adapter and plugged it in. I'm a Windows guy, so most of what Linux does appears magical to me. I had a suspicion that the Raspberry Pi would get on my wifi all by itself. Of course it didn't because at the very least it didn't have my SSID and WPA pre-shared key (the password). I was lucky enough that the Raspbian distribution recognized it and fired it up without requiring me to load any drivers (thank the stars!). I verified this by issuing an iwconfig command. This showed me that it was all ready to go. Since my network uses WPA2 encryption, I had to configure a built in utility called supplicant. In the end, all I had to do was edit /etc/wpa_supplicant/wpa_supplicant.conf and add a couple lines:
ctrl_interface=DIR=/var/run/wpa_supplicant GROUP=netdev
update_config=1
network={
ssid="Hobbiton"
proto=RSN
key_mgmt=WPA-PSK
pairwise=CCMP TKIP
group=CCMP TKIP
psk="yeahright"
}
Much documentation online says all you have to do to get it working is bring the interface down and back up. I wasn't able to get it to grab a DHCP address without rebooting the Pi. To get the interface to come online at boot time, I added ifup wlan0 to /etc/rc.local.
After I got the Pi up and running, it was time to install a few things that aren't included in the base image. Mainly, I needed mplayer (that's the media player that will actually play the music) and ffmpeg (a bunch of codecs that will allow mplayer to play all kinds of files including mp3 and m4a). I also wanted to be able to access the log file from wherever, so I decided to install a lightweight web server. I'll log to index.html in the www folder. Type sudo apt-get install lighttpd mplayer ffmpeg and sit back for a while.
ctrl_interface=DIR=/var/run/wpa_supplicant GROUP=netdev
update_config=1
network={
ssid="Hobbiton"
proto=RSN
key_mgmt=WPA-PSK
pairwise=CCMP TKIP
group=CCMP TKIP
psk="yeahright"
}
Much documentation online says all you have to do to get it working is bring the interface down and back up. I wasn't able to get it to grab a DHCP address without rebooting the Pi. To get the interface to come online at boot time, I added ifup wlan0 to /etc/rc.local.
After I got the Pi up and running, it was time to install a few things that aren't included in the base image. Mainly, I needed mplayer (that's the media player that will actually play the music) and ffmpeg (a bunch of codecs that will allow mplayer to play all kinds of files including mp3 and m4a). I also wanted to be able to access the log file from wherever, so I decided to install a lightweight web server. I'll log to index.html in the www folder. Type sudo apt-get install lighttpd mplayer ffmpeg and sit back for a while.
The next thing is to get the actual music onto the Raspberry Pi. At first, I started out by putting all the music (and my scripts) on a USB stick. In order to give the Pi access to a USB drive, just follow the instructions here. I eventually went instead with a network attached hard drive, so I followed the instructions here to create a persistent mount to my NAS. After a while, I noticed some jitter in the music, so I moved the data back to the SD card (where the OS is also installed). I'm trying to listen now to see if that makes a difference to the jitter.
Now, on to the script. The script runs as a cron job. The comments should explain exactly what's happening.
Now, on to the script. The script runs as a cron job. The comments should explain exactly what's happening.
By the way, the contents of /mnt/nas/PiTunes are: christmas/ nothing/ music/ play.sh waves/. Version 2 of the script will play the Christmas directory instead of the music directory during the month of December.
The next part involves running the script from CRON, which is equivalent to Windows' Scheduled Tasks. To add jobs, just run crontab -e. The format is one job per line, parameters separated by spaces:
Mine looks like this:
So, let's look at the objectives again:
- I want the music to come on and turn off by itself - check!
- I don't want the music to start off at full blast in case we've put the boys down early - check!
- I want the music to play whenever we put the boys to sleep, which could be as early as 7pm but as late as 9pm - check!
- I want to be able to rotate playlists so it's not the same thing every night - check!
- I want to be able to kick off the music any time - this can be done, although it's not as easy. I have to ssh to the Raspberry Pi and kick off the script manually. However, if it's a silent day, nothing will happen. I'll probably look at a way to adjust the script so that when it's called from CRON it does its normal thing but when called from command line it always plays music.
- I want to be able to manually override either the current song or the current volume level - This can also be done, but it's not as easy. While in ramp up or ramp down mode, the volume doesn't increase/decrease by 1, it gets set to a particular level. Overriding the volume during ramp up/down won't make any difference because as soon as the script loops it will reset the volume to right back where it was. I may be able to change this in the future. While playing, I can change the volume by logging in via SSH and issuing amixer -q set PCM X% where X is the volume I want to set to. However, during ramp down, the volume starts back at 100% before dropping down. It may not take much, but the next version may have an increment/decrement instead of fixed volume levels. If I get this working, this objective will be met.
Some of the plans I have for the future are an automatic switch over to Christmas music instead of regular music during the month of December, web service based controls, & incremental/decremental volume controls. We'll see when I have time to work on it.
Thursday, April 4, 2013
Raspberry Pi
Today I joined the latest craze sweeping the Internet. No, not Vadering (although I should look into how that could be done with the boys). I bought two brand new computers today. It cost me a total of $70 + shipping. Well, actually, I didn't buy the whole computer, I just bought the motherboard, which has the processor, RAM, video card (with HDMI and analog RCA out), audio card, SD card reader, onboard NIC and 2x USB ports. It's all built into a special little PCB (printed circuit board) that takes advantage of SOC (system on a chip: basically the main guts of a computer all on one chip, similar to most tablets and phones).
 It's called Raspberry Pi and is produced by a non-profit organization that designed them to be used in developing countries for education. Since it's a charity, they designed the board to be extremely cheap and can sell it for $35! They're currently being distributed through three reseller partners officially. Each reseller also sells in bulk to other companies so you can find them elsewhere. The main drive for resellers is the accessories that go a long with it (more about this later). RS (only in Europe), Allied Electronics, and Element14 (through Newark) are the official resellers. For more information, check out the video below or read this article.
I ordered two of them today because for a long time both model A and model B were out of stock everywhere. My dad reminded me last night that they were back in stock so I got one for him and one for me this morning. Here's a good video to introduce what's really behind it.
It should be here within a few days. All that actually comes in the box is the board, no case, no cables, no nothing. So, I'll go dumpster diving into my crates of extra parts in the garage for a 700mA USB power supply (I wonder if the dual USB plug for my portable hard drive would allow this to be powered from my USB hub...), HDMI to VGA converter so I can plug it into my desk monitor, a USB keyboard and a USB mouse (maybe I'll use my Bluetooth dongle and the Logitech diNovo Mini keyboard...), and an SD card. I think I'll start by running Rasbian Wheezy, just to see how well it performs normal desktop tasks. After that I'm going to use it as a test bed for XBMC with RaspBMC to potentially replace my current Windows Media Center dependent installation.
Anyway, I'll try to post my progress as things go along. Eventually, I'll be looking into putting this thing into a case and see what happens. Here are some of the cases I'm looking at


I might even consider making a competitor to the iMac:
 versus
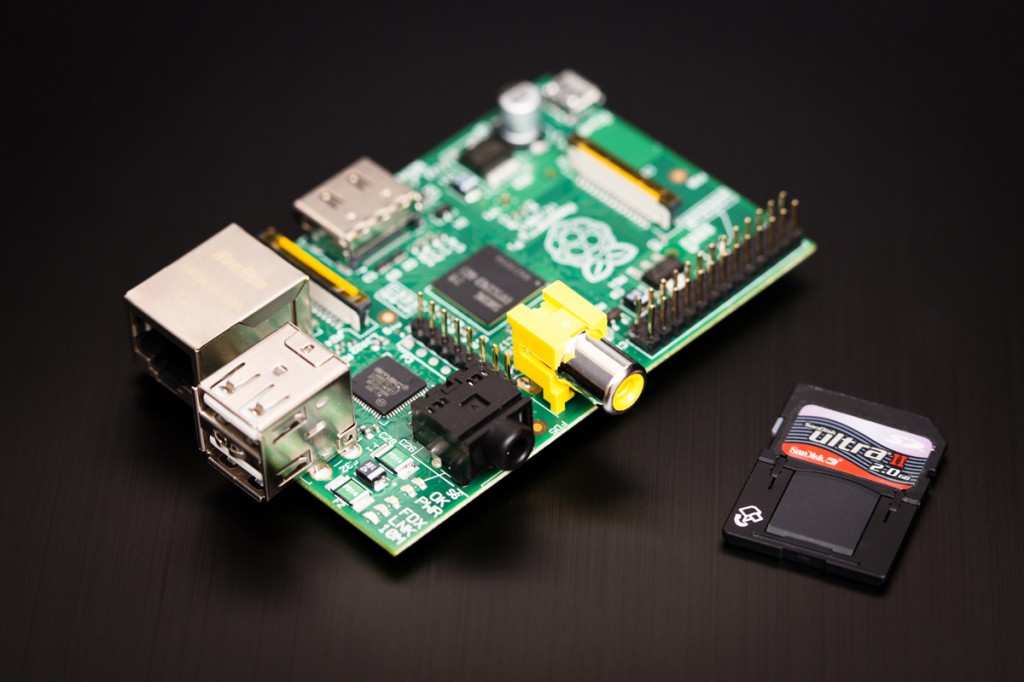
I ordered two of them today because for a long time both model A and model B were out of stock everywhere. My dad reminded me last night that they were back in stock so I got one for him and one for me this morning. Here's a good video to introduce what's really behind it.
It should be here within a few days. All that actually comes in the box is the board, no case, no cables, no nothing. So, I'll go dumpster diving into my crates of extra parts in the garage for a 700mA USB power supply (I wonder if the dual USB plug for my portable hard drive would allow this to be powered from my USB hub...), HDMI to VGA converter so I can plug it into my desk monitor, a USB keyboard and a USB mouse (maybe I'll use my Bluetooth dongle and the Logitech diNovo Mini keyboard...), and an SD card. I think I'll start by running Rasbian Wheezy, just to see how well it performs normal desktop tasks. After that I'm going to use it as a test bed for XBMC with RaspBMC to potentially replace my current Windows Media Center dependent installation.
Anyway, I'll try to post my progress as things go along. Eventually, I'll be looking into putting this thing into a case and see what happens. Here are some of the cases I'm looking at
I might even consider making a competitor to the iMac:
versus
Subscribe to:
Posts (Atom)