I know, 9.0 is an old version, but I had a customer who is transitioning and needed to temporarily enable and disable cloning of flows from the old harvesters to the new harvesters. Here's the resulting script. The first argument should be Y or N depending on whether you want to enable (Y) or disable (N) the flow cloner. The second argument is optional and is the IP address you want to clone to. If you specify the IP address, the flowclonedef.ini file is created. If you don't specify it, no changes are made.
Friday, December 12, 2014
Monday, November 3, 2014
Custom Device Polling in NetVoyant
This is a presentation I gave years ago but the recording on the community has been lost. So, I recorded it again and have posted it here.
Tuesday, August 5, 2014
The dangers of a guest wifi network
The site is associated with Walt Mossberg, so they usually have pretty cool stuff. However, I couldn't agree with this article. Before reading my response, you really need to read the article.
Essentially, the article makes the argument that getting to the internet from your phone via WiFi is better than via a cellular data connection, and therefore people should enable the guest WiFi network in their homes because it's pretty much safe.
Conceded: WiFi is usually faster than Cellular (except in some cases where the 4G network smokes land line internet connections)
Conceded: Enabling the guest WiFi in most residential routers does not pose any additional threat to the internal, private WiFi and local area network.
The big issue with allowing someone else to use your WiFi is that whatever they do with it is your responsibility. Your home internet router uses a very good, very legal technology called IP address overload (aka NAT) to allow multiple devices in your home to access the internet while you only pay for access for one device (your router). Your router acts as a proxy of sorts to the internet for all devices in your home and on your wifi. To anyone on the internet, when your phone accesses a website, it looks like your router is accessing that website. The router's NAT technology takes care of accessing the website for your phone and ferrying the data back to your phone. This is great because it allows you to pretty much have as many devices as you want on your home network, and they all have access to the internet, via your router.
Your router is masking the internal machinations of your home network. This means that it's practically impossible to determine which device on your home network your router is proxying. This is also great because it builds a barrier between the outside world (the internet) and your inside network, making it harder for malicious users to gain access to your inside devices. The best they could do would be to try to communicate with your router, which is usually pretty well protected against malicious attacks.
However, if you allow anyone to get onto your WiFi, their traffic is also proxied by your home router. So, if I come to your front curb and jump on your WiFi and download a movie and the MPAA/FBI happened to observe my download, they would not be able to determine the "inside" device that initiated the download. To them, it just looks like your router is downloading a movie. The owner of the internet access (you) could go to jail for piracy. The argument, "It wasn't me; it was someone who hacked me" doesn't fly in court. Since authorities on the internet see one device doing everything, there is no way to determine whether the activity is coming from your guest wifi or your own computer. So, they hold you (the owner of the one device they can prove is doing something: your router) responsible.
Places that have guest WiFi networks have very powerful systems in place and/or legal agreements that you agree to before being allowed access that prevent you from doing anything malicious with their internet and which hold them blameless for any malicious activity you may do with their free WiFi.
If you have those mechanisms in place, feel free to open up your guest WiFi. I'm a network tools guy and I don't even have those kind of tools in place. I don't recommend that you do, despite the benefit it might give to someone walking by.
Wednesday, July 30, 2014
Raspberry Pi News
I know I'm late to the show with my own blog post about the new happenings issuing forth from the Raspberry Pi Foundation, but I figured better late than never.
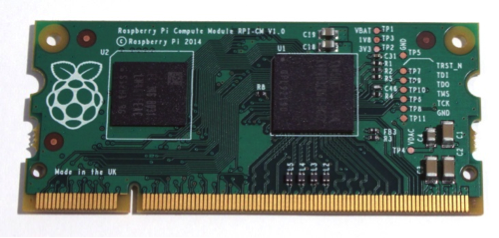
A few new developments have made news recently and bode well for hobbyists and inventors alike. The first (chronologically) was the release of the compute module. This is a raspberry pi just like any other, except that the whole thing is designed onto a chip that looks just like a laptop memory module.
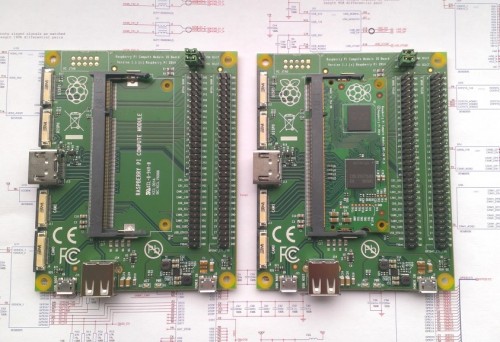
 The cool part about this is that people can now design their own main board and slip in this tiny chip to get all the features or the raspberry. This means that the main board can be designed to fit just about any need out there from small point-and-shoot cameras to large supercomputers. The foundation came out with an example main board:
 But this is just an example and a board like this could be designed to meet the inventor's needs, changing the number of pins, ports, connectors, etc.
The second bit of gooey goodness is the release of the Raspberry Pi Model B+. This is the next evolutionary (not revolutionary) step in the progression of this little platform.
 This new model is pretty much backward compatible with the Model B, but adds a couple of really useful features:
The third bit of really cool news is the release of specifications around HATs (Hardware Attached to the Top). To break it down very simply, this allows add-on boards to tell the Pi that they're connected and give specific information about themselves to the Pi. This could make connecting an add on board very simple since instructions could be included in the add on board itself that help set it up (install software, configure pins, setup shortcuts on the desktop, etc.). I haven't found the official blog post announcing it, but James Adams spoke about it in a recent interview. Here is what they're theoretically supposed to look like. I'm guessing Adafruit will be releasing a HAT starter board soon which would at least include the mounting hardware (since the holes should line up with the holes on the B+) and maybe the EEPROM and other components defined by the standard.
In case that wasn't enough, I've seen two articles recently that I've kept in my browser tabs so that I can refer to them the next time I purchase a Pi (usually every other month). The first is an update about the method used by many to turn the Pi into a video game emulator. This used to be a really complicated process that took a ton of time, but thanks to the guys over at petRockBlog and Emulation Station, this process is greatly improved. You can go straight to the source, or you can check out this article which gives instructions for the uninitiated (it's spelled out pretty clearly). I've got a B+ on order right now, so as soon as it comes in, this will be on of the first things I do with it.
And if that's not enough, here's an article about the first 5 things to do after powering on your Pi. While installing Minecraft and overclocking aren't required, they are mentioned as the most popular things to do.
A few new developments have made news recently and bode well for hobbyists and inventors alike. The first (chronologically) was the release of the compute module. This is a raspberry pi just like any other, except that the whole thing is designed onto a chip that looks just like a laptop memory module.
The second bit of gooey goodness is the release of the Raspberry Pi Model B+. This is the next evolutionary (not revolutionary) step in the progression of this little platform.
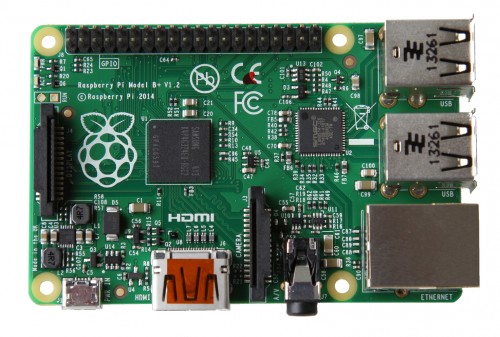
- More GPIO pins - 40 pins instead of 26. (This also allows old IDE hard drive ribbon cables to be used!)
- More USB ports - 4 ports instead of 2.
- Micro SD - the SD is smaller, has a secure latch, and doesn't stick out anymore.
- Power redesign - the B+ uses less power due to better technology.
- Better audio - this should be good for my PiTunes.
- Better form factor - all the onboard ports now only come out of 2 sides instead of the 4. This should make stuffing the Pi into a small corner a bit easier. Also, the mounting holes are uniform and there are 4 of them, which should make building cases a bit easier. Also it helped pave the way for HATs (more on this later).
The third bit of really cool news is the release of specifications around HATs (Hardware Attached to the Top). To break it down very simply, this allows add-on boards to tell the Pi that they're connected and give specific information about themselves to the Pi. This could make connecting an add on board very simple since instructions could be included in the add on board itself that help set it up (install software, configure pins, setup shortcuts on the desktop, etc.). I haven't found the official blog post announcing it, but James Adams spoke about it in a recent interview. Here is what they're theoretically supposed to look like. I'm guessing Adafruit will be releasing a HAT starter board soon which would at least include the mounting hardware (since the holes should line up with the holes on the B+) and maybe the EEPROM and other components defined by the standard.
In case that wasn't enough, I've seen two articles recently that I've kept in my browser tabs so that I can refer to them the next time I purchase a Pi (usually every other month). The first is an update about the method used by many to turn the Pi into a video game emulator. This used to be a really complicated process that took a ton of time, but thanks to the guys over at petRockBlog and Emulation Station, this process is greatly improved. You can go straight to the source, or you can check out this article which gives instructions for the uninitiated (it's spelled out pretty clearly). I've got a B+ on order right now, so as soon as it comes in, this will be on of the first things I do with it.
And if that's not enough, here's an article about the first 5 things to do after powering on your Pi. While installing Minecraft and overclocking aren't required, they are mentioned as the most popular things to do.
Monday, July 14, 2014
Creating a Security Camera Page for the iPad
I may have posted before about the Foscam cameras I have around my house. I have one inside the house and three outside, covering all the doors. There are a myriad of apps out there that allow you to view live streams from Foscam cameras, however, most of them are either designed for iPhone (thus for iPad you have to use pixel doubling, which sucks) and/or they have a bunch of chrome that I'd rather not waste screen real estate showing.
A couple years ago I bought one of the first generation iPads. It was great, but given the OS upgrades that it's missing out on and the low resources that most modern apps blow right past, it's become less and less used. I decided to get some more use out of it by building a small web page with custom controls to stream each of my cameras' feeds to the iPad. The thought was to mount the iPad near the front door so that I could do a quick check of all the cameras while walking to the front door to answer a caller (since one of the cameras looks at the front door, I'd also get a quick look at the caller without looking through the peephole). After looking around at some of the DIY options, I decided to go with a Luxone iPad Wall Mount since they had one specifically built for the 1st generation iPad. It was more expensive than some of the DIY options, but the finished product looks cleaner (IMO). The place where I had decided to mount the iPad had a light switch right below it. A quick test with the multimeter showed that power is run to the switch instead of the light, so I could wire in an iPad charger which would draw power regardless of the state of the light switch. Fast forward a couple of hours and I had made some room in the circuit box for the iPad charger, soldered on some leads which were wired into the switch's hot wires and ran the iPad cable up and out of the switch to the wall mount. The end result is that the iPad sits in a landscape position and always has power. A quick change of the config so that it never auto-locks and the iPad stays on 24/7.
As for the page, I had several web servers around were I could host the page. It didn't take much to design the page, but I wanted some extra fun. I decided that tapping on a camera feed should blow the feed up to the full size of the screen. Tapping again would shrink it down to its original size. This was easily accomplished with a bit of CSS. Essentially, there are three things in the CSS:
- The standard classes that setup the body
- An option that sets the initial size of each stream and specifies the timing function for CSS animations.
- 4 classes that determine where the streams sit
- 2 classes that are tied to the animation (one to grow one to shrink)
- 2 animations (one to grow one to shrink)
- Switch to the other class so that the animation happens
- Set the final style parameters of the stream so it stays the way it is at the end of the animation
Wednesday, March 26, 2014
Putting a Hidden Help Section on a Web Page
Continuing in a series of posts, here's how to add a hidden div to a web page (and make it visible on demand).
For the health check report, I had built a way to transform the output of the script into a usable report and added editable content so that the report could be further tweaked after rendering the page. Given that others would eventually be using the report, I needed to add a way to help non-coders when inserting content into the report so that it looked cogent and coherent. Thus the help section.
However, I couldn't put a help section on the final report, that wouldn't look good when the report was delivered to the customer. So, I had to create a way for the help section to be normally hidden, with a button or link to display the help section. Also, the button had to be hidden!
Let's start with the help section itself. Take a look at the XSLT itself. The help section is simply a DIV containing the help content, with some special CSS applied to hide it until needed. Look at line 22. Notice that the display style is set to none. This hides the DIV entirely and collapses the space around it. It's as if the DIV isn't even there.
Now for a button to show the div when needed. Look at line 15 and you'll see an image with an onclick function. The function is contained in the external JavaScript file (lines 23-29). The JavaScript simply toggles the display style from none to block and back. Really, it wouldn't be too much to just put that function right in the img tag itself, but since I already had the external JS file, it was just as easy this way.
Another look at line 15 will show that the img is contained within a div with id="helptoggler". That div has three lines of CSS that essentially make it invisible until the mouse hovers over it and also puts it in the top left corner of the page:
This means that the image is in the top left corner of the page, is hidden until moused over, and when clicked shows the help section.
For the health check report, I had built a way to transform the output of the script into a usable report and added editable content so that the report could be further tweaked after rendering the page. Given that others would eventually be using the report, I needed to add a way to help non-coders when inserting content into the report so that it looked cogent and coherent. Thus the help section.
However, I couldn't put a help section on the final report, that wouldn't look good when the report was delivered to the customer. So, I had to create a way for the help section to be normally hidden, with a button or link to display the help section. Also, the button had to be hidden!
Let's start with the help section itself. Take a look at the XSLT itself. The help section is simply a DIV containing the help content, with some special CSS applied to hide it until needed. Look at line 22. Notice that the display style is set to none. This hides the DIV entirely and collapses the space around it. It's as if the DIV isn't even there.
Now for a button to show the div when needed. Look at line 15 and you'll see an image with an onclick function. The function is contained in the external JavaScript file (lines 23-29). The JavaScript simply toggles the display style from none to block and back. Really, it wouldn't be too much to just put that function right in the img tag itself, but since I already had the external JS file, it was just as easy this way.
Another look at line 15 will show that the img is contained within a div with id="helptoggler". That div has three lines of CSS that essentially make it invisible until the mouse hovers over it and also puts it in the top left corner of the page:
- #helptoggler {position:absolute;left:0px;top:0px;}
- #helptoggler > img {visibility:hidden;width:32px;height:auto;}
- #helptoggler:hover > img {visibility:visible;}
Since the JavaScript is built as a toggler, the same function can be called anywhere a link is desired to hide the help section. Clicking on the image in the top left corner hides the DIV, but notice that within the help section itself is a span with an onclick action calling the same JavaScript function (line 24).
Once again, if you want to play with the files themselves, just download, unzip, and open the XML file in IE.
Displaying Editable Content on a Web Page
In my previous post, I detailed how I went about transforming an XML document into a readable report, displaying data from the XML. If you downloaded and tried out the files, you should have noticed that the final report was more than I described.
Particularly, there were two things I glossed over:
First is the div containing the content. This div has a unique id and uses a CSS class of 'editablecontent'. This CSS class is what puts the red line around the editable content and also puts the edit button. Click here to see the CSS (pay attention to lines 63-85).
The main DIV has two children, the edit image and the content DIV. The edit button has some special CSS that make it only visible when the mouse moves over the parent DIV. The child DIV is the one containing the content.
Notice the image has a JavaScript function attached. The JavaScript is contained in a separate file (but could just have easily been included in the XSLT). The JavaScript simply switches from a static DIV to an editable textarea box and back again. Depending on which save button is pressed, the JavaScript will return to a DIV that looks like a draft or a final version.
Adding editable content to the XSLT all over the place made it easy to use the data from the XML but have a last minute override for any of the content (i.e. to fix a single misspelling without editing the XML manually).
To see it all in action, download the files, unzip, and open the XML file in IE.
Particularly, there were two things I glossed over:
- There are several boxes on the page that have edit buttons and can be modified after the page is rendered.
- There is a hidden div that shows the report author how to format additional content so that it shows up with the same style as the rest of the content on the page.
I'll cover #2 at a later time. Right now, I wanted to talk about how the editable content was built. Remember, the point of the project was to build a final report that could be delivered to the customer. A script was used to gather a bunch of data and output it to XML. An XSLT was used to transform that information into a more readable format. While the script was good at gathering much of the information needed, it didn't go into wordy detail about the recommended changes to be made. Thus a method of adding to the document was needed.
Initially, I built a section of the XML that would allow the user to input all the information needed right into the XML. That way, the XML transformation and PDF generation would be the last step in generating the report. However, that wasn't too sexy and I still found myself needing a way to edit the content after it was rendered.
So, I came up with EditableContent. This comprised of a few components. Here is what part of the code looks like:
- <h2>Summary Recommendations</h2>
- <div id="recsummary" class="editablecontent">
- <img src="health_check_files/edit-icon.png" onclick="editcontent('recsummary','recsummary_content')" />
- <div id="recsummary_content">
- <xsl:if test="reportinfo/recsummary!=''"><xsl:value-of select="reportinfo/recsummary" disable-output-escaping="yes"/></xsl:if>
- <xsl:if test="not(reportinfo/recsummary) or (reportinfo/recsummary='')">Provide a summary description of your recommendations<br /><span class="example">EXAMPLE</span>: The primary recommendations resulting from the data gathering, assessment, and analysis performed during this Health Check are to upgrade both hardware and software on the core NMS components of the infrastructure. In addition to hardware and software upgrades, a review of the alarm/event management process is recommended. Architecturally, the NMS deployment is in accordance with a “Best Practices” implementation for an organization of this size.</xsl:if>
- </div>
- </div>
First is the div containing the content. This div has a unique id and uses a CSS class of 'editablecontent'. This CSS class is what puts the red line around the editable content and also puts the edit button. Click here to see the CSS (pay attention to lines 63-85).
The main DIV has two children, the edit image and the content DIV. The edit button has some special CSS that make it only visible when the mouse moves over the parent DIV. The child DIV is the one containing the content.
Notice the image has a JavaScript function attached. The JavaScript is contained in a separate file (but could just have easily been included in the XSLT). The JavaScript simply switches from a static DIV to an editable textarea box and back again. Depending on which save button is pressed, the JavaScript will return to a DIV that looks like a draft or a final version.
Adding editable content to the XSLT all over the place made it easy to use the data from the XML but have a last minute override for any of the content (i.e. to fix a single misspelling without editing the XML manually).
To see it all in action, download the files, unzip, and open the XML file in IE.
Monday, March 10, 2014
Raspberry Pi Possible Projects
Whenever I get into a conversation with people about the RaspberryPi, the question always comes up, "What would I do with something like that?" This post answers that question. In addition to the two projects that I've already completed (PiTunes, DoPi), here are some project that I've run across that are pretty cool ideas:
- Make your own radio station - be careful with this one; once you're transmitting beyond a particular power level (which isn't really controllable in the Pi), you're required to have a license from the FCC (even if no one else is transmitting on the same frequency).
- Make an motion detector - this one is pretty cool since it uses Google's translate service to speak whatever text you want.
- Get the heck outta my office device - Ok, this one actually uses an arduino, but it would be pretty easy to make something like this using the RPi.
- Make a simple webcam
- Make an Apple iBeacon - I may actually integrate this into DoPi at some point so you get a push notification on your phone as you drive up to your house, prompting you to open the garage door. Otherwise, it could be used for a variety of annoying reasons (including on a convention floor to drive people to your booth...). (Alternate method)
- Make an AirPlay receiver - an AirPlay receiver will receive a stream of music from an Apple iOS device (phone, tablet, or even iTunes on a PC/Mac) and output it to speakers. This can be handy if you ever wanted to add music to a room without major electronics.
- Make a camera
- Make a tablet
- Connect your analog phones to Google Voice
Friday, January 10, 2014
UCDavis MIB for Monitoring Linux Memory
I discovered quite some time ago that the Net-SNMP agent on my RaspberryPi doesn't report memory utilization in the hrstorage MIB like I would expect it to. It's not wrong, however, the value doesn't match up with what's actually being used on the device. The reason for that is that Linux can use the system RAM for several things: processes, shared memory for processes, buffers, and disk cache. When most people ask how much memory is in use, they are asking for how much memory is in use by the processes. That's the value you get on the second row under the 'used' column of the output of the free command:
However, the OIDs in the hrstorage MIB actually return the value from the first row of the 'used' column. The problem is that both of these numbers represent memory utilization. The first row shows the total of the processes, shared, buffers, and cache. That's the total amount of memory that's in use on the system. However, this isn't the value most people associate with memory utilization.
In order to get the correct value, there are two options. The first doesn't work with NetVoyant, but it doesn't use additional MIBs or OIDs to get the data.
Since the shared, buffer, and cache memory is reported in the hrstorage table, you can simply take hrStorageSize of the Physical Memory row (hrStorageType==1.3.6.1.2.1.25.2.2), and subtract the hrStorageUsed from the shared, buffer, and cache rows (hrStorageType==1.3.6.1.2.1.25.2.1.1). Since NetVoyant can't use values from other poll instances in an expression, it won't work in NV.
Given the output above, here are the OIDs or combinations you need to calculate the values:
However, the OIDs in the hrstorage MIB actually return the value from the first row of the 'used' column. The problem is that both of these numbers represent memory utilization. The first row shows the total of the processes, shared, buffers, and cache. That's the total amount of memory that's in use on the system. However, this isn't the value most people associate with memory utilization.
In order to get the correct value, there are two options. The first doesn't work with NetVoyant, but it doesn't use additional MIBs or OIDs to get the data.
Since the shared, buffer, and cache memory is reported in the hrstorage table, you can simply take hrStorageSize of the Physical Memory row (hrStorageType==1.3.6.1.2.1.25.2.2), and subtract the hrStorageUsed from the shared, buffer, and cache rows (hrStorageType==1.3.6.1.2.1.25.2.1.1). Since NetVoyant can't use values from other poll instances in an expression, it won't work in NV.
Side Note: This may be possible by creating a single expression that results in the positive value of hrStorageSize when the hrStorageType is .2 and a negative value of hrStorageUsed when hrStorageType is .1. The sum of that expression for all the .1 and .2 poll instances should give you the total used memory. However, since the sum could only be done in a view in the web GUI, it would only work for reporting and not thresholding/alarming.The second option is to use the UCDavis MIB. The NetSNMP agent does populate the UCDavis tables, so any of the values there can be polled. The problem is that there's no real clear documentation on which OIDs give you which values when compared to the output of the free command. Here's the mappping:
Given the output above, here are the OIDs or combinations you need to calculate the values:
- memTotalReal
- memTotalReal - memAvailReal
- memAvailReal
- memShared
- memBuffer
- memCached
- memTotalReal - memAvailReal - memShared - memBuffer - memCached
- memAvailReal + memShared + memBuffer + memCached
- memTotalSwap
- memSwapError
- memAvailSwap
Given this, it should be pretty easy to create a dataset to poll memory. Just remember, these OIDs are in units of KB, so if you want it in Bytes so that NV automatically scales (to KB, MB, GB, TB, etc.) you'll need to multiply each one by 1024. Obviously, if you're calculating % utilization, you don't need to multiply both the numerator and the denominator by 1024. You will need to multiply by 100 to get the ratio to a scale of 0-100%.
Wednesday, January 8, 2014
Combining All Files into a Single Batch
One thing I figured out how to do was to simplify the installation of a complex set of files that are used as auxiliary files for a master batch file. For example, for the tool that I built over the last few weeks, I ended up with gatherer.vbs, entitycleaner.pl, and tsv2csv.pl that were all called from within the master batch file. While I was developing things, it was handy to have these as individual files because I could easily edit them individually. However, when installing the tool on the final server where it needed to go, I had to zip up all the files (including some other files that I haven't released yet), copy them over, and unzip them (replacing the existing ones if they were already there). This wasn't too efficient and I needed an easier way to transmit the scripts.
The solution I came up with was to embed the contents of the auxiliary files into the master batch file. I then instructed the master batch file to echo the auxiliary file contents into the files at runtime. This meant that I only had to transmit the single batch file to the target server and run it. When it ran, it would create the files it needed, use them, then destroy them. This also kept the working directory clean.
There were a few caveats, however. The biggest hurdle is trying to echo the special characters that other programming languages use from within a batch file. There were two main resources that I used to make sure things worked right. The first is Rob VanDerWoude's web page on escaping special characters. This helped me determine which characters from the source script would have to be escaped when echoing out from the batch file to the auxiliary file. The second utility I used was http://text-compare.com/. It allows you to compare one text file to another and tells you where the differences are.
The next thing I did was create a simple batch file to echo each line of the content out to a new file. I then took the original content and compared it to the content created by the simple batch file. For example, for tsv2csv.pl on the left, I created the batch file on the right:
You can see that the batch file on the right uses the carat (^) to escape several of the characters. Since I used one redirector at the end (line 11) to output the entire thing into the test output file, lines 2-10 needed to be in parenthesis. This means that all parentheses needed to be escaped. Also, since > and < are redirectors in Windows Command, they also had to be escaped. Interestingly enough, since the > on line 8 is in double quotes, it doesn't need to be escaped. This is only possible since I needed the double quotes anyway in the auxiliary file. If I had used single quotes on line 8, I would have had to escape the >.
In this way, I combined all the auxiliary files into one single batch file. I added the lines from the test batch file into a function in the master and called the function from the main program section of the master batch.
Some other characters that have to be escaped are the ampersand (&), pipe (|), and percent (%). The & and | were easily escaped. However % proved to be more difficult. Normally, the % sign is followed by a non-alphanumeric character (space or punctuation). However, when trying to output a date format for SQL, the % sign is followed by characters (i.e. %Y-%m-%d). This causes a problem because Windows command is reads each of those a variables. You can't even escape them because in a batch file, the double percent (%%Y) reads as a variable too. In the end, what I had to do was store 'Y' in a variable called 'FormatY' like this:
set formatY=Y
echo %%%formatY%
The first two percent signs read as an escaped percent sign and a single % is echoed. The %formatY% resolves to Y and a single Y is output. To get the whole string, I did this:
set formatY=Y
set formatm=m
set formatd=d
set formatH=H
set formati=i
set formats=s
echo %%%formatY%-%%%formatm%-%%%formatd% %%%formatH%:%%%formati%:%%%formats%
The output looks like this:
%Y-%m-%d %H:%i:%s
This is a messy way of doing things, but it works.
Tuesday, January 7, 2014
Convert Tab Separated Values to Comma Separated Values
Using MySQL to output CSV files can be a bit of a pain. You have two options depending on where you want the file to end up. If you want to write the file to the server, you can append your query with a bunch of lines detailing what separator character to use, what file name to output to, and what text delimiter to use. This is great if you want the file to be on the server. However, if you're accessing MySQL remotely, you usually want the file to be saved locally. This is fairly easy, but the simple method only outputs in a tab separated values file instead of comma separated. Since I wanted CSV, I designed a short Perl script to go through a TSV and change all the tabs to commas. This is very similar to the entities cleaner posted earlier.
Line 2 opens the file specified in the first argument. Line 3 sets up the variables. Lines 4-9 replace the \t character with a comma. Lines 10-11 close the input file and open the same file as the output file (using clobber to overwrite the original contents). Line 12 outputs the cleaned lines to the output file and line 13 closes the file.
Line 2 opens the file specified in the first argument. Line 3 sets up the variables. Lines 4-9 replace the \t character with a comma. Lines 10-11 close the input file and open the same file as the output file (using clobber to overwrite the original contents). Line 12 outputs the cleaned lines to the output file and line 13 closes the file.
Monday, January 6, 2014
Entity Cleaner
The entity cleaner was a workaround for a problem I didn't want to take more time to resolve. I have a script that queries a MySQL database and outputs an html table. This works great, however, I wanted to be able to format some of the content in the table, in this case, align the text to the right side of the cell. The code to right align the content was easy. However, when MySQL outputted the HTML, the HTML I had added was converted into HTML entites. So, instead of showing the content right aligned, it showed all the markup around the content. So, I needed to do some post processing of the file to convert the HTML entities to their actual characters. This Perl script was the answer. Since my output only contained three entites, they are the only ones I replace here. However, this could be easily expanded to include all the basic entities.
Line 2 gets the input file name and stores it for later use. Line 3 sets up the array that will contain the content as it's being cleaned. Line 4 sets up a counter. Line 6 opens the file. Lines7-14 clean the entities. Line 8 grabs the next single line from the input file. Line 9 stores that line in the corresponding element in the array. Line 10 replaces the < with <. Line 11 replaces the > with >. Line 12 replaces " with ". Line 13 moves us to the next line.
Lines 15-18 closes the intput file, sets the output file to the input file (change in place) and opens the file for outputting.
Lines 19-23 output the contents of the array to the output file and give a confirmation message.
Saturday, January 4, 2014
Gatherer
One of the major pieces of the tool that I spent the last few weeks working on is the gatherer. It's written in Visual Basic since it was the easiest thing to use without installing additional modules (like I would have had to do with Perl). The purpose of this script is to download a file via http and save it locally. I used a modified version of this final script in my tool.
The script must be called with 2 arguments. The first is the name of the server to fetch from. The second is the file to fetch. This is a simplified version of my script. It could be simplified further to just provide a URL instead of the two pieces. If you want that, tell me in the comments and I'll modify it and post it.
Line 7 takes the first argument and stores it in the targetServer variable. Lines 8-9 build the final URL to fetch. This is where the simplification could be made to just fetch a provided URL.
Lines 10-13 actually fetch the file and echo back the response code. Lines 14-16 check that response code for any errors and exit the script with an ERRORLEVEL of 1 if there was a problem. The only thing this doesn't check for is 'Server not found' errors. Maybe I'll look into that problem later.
Lines 17-32 execute if the HTTP response code doesn't indicate a problem. Lines 18-24 get the current working directory so that the downloaded file can be saved there. Lines 25-31 actually save the file. The file is saved with a modified file name in the format [servername][originalfilename].
Friday, January 3, 2014
Batch File Template
I've done some major work over the last few weeks with batch files. In fact, I just finished a tool that utilizes 5 different languages (Windows batch, Perl, VBScript, HTML, & SQL) to accomplish some pretty cool stuff. In the process of building the tool, I had to set some standards in the way I work with the various programming languages.
One major step was to finalize (at least in my mind) my method of writing batch files. So, I came up with the following template that I'll probably use for any projects going forward. I'll explain the various features:
The first section of code (lines 2-7) sets the default variables that this script will use. This section can be used to declare the default value for any number of variables. It also sets the current version and last updated date.
The next section (lines 8-19) branches out to the built in help. This will not execute the main program and instead will go to the help section (lines 42-51) and execute the code there. Most of the time, I just put echo statements there to echo the help documentation out to the screen. The GOTO:EOF simply returns execution control to the calling process. For help this means returning to the command prompt. If some arguments are required, you can easily branch to the help section by unREMarking line 9. This will execute the help commands and exit if no arguments are specified. This is handy because you can then just run the batch file without any arguments and see the help (the way most built in commands work).
The next section (lines 20-26) reads in the command line arguments. If the switches for variable1 and variable2 are present, the value immediately after the switch is read into the variable (for numbers and strings). If the switch for variable3 is present, variable3 is set to 1 (boolean). The shift and GOTO Loop commands cycle through all the arguments until none remain (line 21).
The next section (lines 27-35) is the main section of the program. The first thing that happens is that the version is echoed by calling the version function (lines 52-54). In this case, :version acts like a function (with no returning value). This is handy since version can be called multiple times in different places in the main program execution (for example outputting the version at the end of any output files). The version function can be extended to include author information or links to online documentation.
The next section (lines 39-41) is a custom function that is called from the main program. It is called on line 34 with one argument. Normally arguments separated by a space are treated as two, but these are surrounded by double quotes, which makes it one. The %~1 on line 40 grabs that argument and outputs the argument without quotes.
Subscribe to:
Posts (Atom)